22.2 The security within your app
Two main security actions:
Shiny
inputsuse client-side validation such as data that is user-specific and need the user to authenticate before useShiny
server()code isolation; one user cannot see data from another user in a different session, the only exception is if caching is in use, more about this is specified in the last chapter of the book
Data
Sensitive data and passwords are the most targeted objectives of the attackers, for this reason is recommended to:
do not store password in the source code of your app, but eventually, in a variable in the environment
use a .yml file to store login credentials
use
.gitignoreto include the appropriate files containing your authentication credentials
Authentication and client-side validation
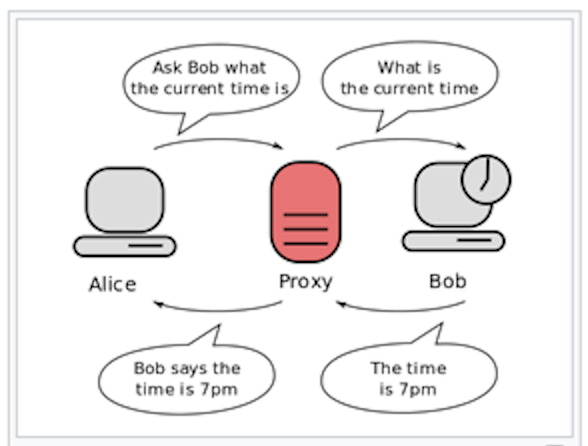
There is more than one alternative to authenticate, first thing is that you need to add some kind of layer between the user interface and the Shiny server, i.e. a proxy
Figure 22.1: proxy
It will redirect the user to an authentication page, as in a login page, and once authenticated it will check whether the user is authorized, and then let them get access to the Shiny application.
The following section lists five packages for configuration, authentication, and storage of login credentials. There are several options to choose from based on your need and design of the app.
Packages:
1 - The first package suggested by the book is {config} package, it is used to manage environment specific configuration values.
Figure 22.2: config package
How to install config and all the other packages (substituting the package’s name where appropriate):
install.packages("config")
library(config)
How to store the password in a file with config in practice ?
The package makes easier to deploy content, and in this context is used to keep the credentials outside of the R script by saving them in the config.yml file while keeping it in the current working directory.
YAML(tm) are type of files made for making easier international collaboration with a language which is both human readable and computationally powerful.
An example of a .yml file is a config.yml file:
default:
uid: "my-name"
pwd: "my-password"
And to recall the information back from its directory:
config <- config::get(file = "conf/config.yml")
config$uid
config$pwd
2 - Another interesting package, mentioned in the search-engine of “securing a Shiny app” is {auth0} package.

Figure 22.3: auth0 package
It is an identity provider, it offers a server where to store shiny apps as well as procedures for setting credentials at access. You need an account where to load your app and set up the credentials.
_auth0.yml files can be created with the command use_auth0() which can be automatically positioned in the app.R directory and it is already filled with basic information:
auth0::use_auth0()
Here is the content of the _auth0.yml file:
  name: myApp
  remote_url: ''
  auth0_config:
  api_url: !expr paste0('https://', Sys.getenv('AUTH0_USER'), '.auth0.com')
  credentials:
  key: !expr Sys.getenv("AUTH0_KEY")
  secret: !expr Sys.getenv("AUTH0_SECRET")
Then set up the keys using
usethis::edit_r_environ("project")
which adds a .Renviron file in your project directory for you to modify the content with
  AUTH0_USER   = ...
  AUTH0_KEY    = ...
  AUTH0_SECRET = ...
It adds a layer between Shiny and the user. And then you can retrieve the credentials using Sys.getenv()
auth0::Sys.getenv("AUTH0_USER") This method is not exclusive of auth0package but is a recommended approach to use for storing Credentials inside Environment Variables even with other packages.
3 - A simple and secure authentication mechanism for single ‘Shiny’ applications is through {shinymanager} package.

Figure 22.4: shinymanager package
Here is a live demonstration of the potentiality of this package:
it follows with these authentication credentials:
user: shiny / password: shiny
user: shinymanager / password: shinymanager (Admin)
In particular it provides a function to secure_app() in which to wrap the ui:
Wrap your UI with secure_app
ui <- secure_app(ui, choose_language = TRUE)
As well as in the server() with the following commands:
secure_server()
check_credentials()
4 - The {shinyauthr} package is very useful for providing key function to use.

Figure 22.5: shinyauthr package
These are the main functions which invisibly call JavaScript with the command shinyjs::useShinyjs() internally:
loginUI()
loginServer()
logoutUI()
logoutServer()
It also provides a method for cookie-based automatic login, which means that the system can store the credentials for some time as established by the creator of the app.
5 - {sodium} package is software library for encryption, decryption, signatures, password hashing and more.

Figure 22.6: sodium package
Generally used in this contest to encrypt passwords with simple commands such as:
user_name = "user_authr_1",
password  = sodium::password_store("pass_authr_1")
which releases the password in this format:
## [1] "$7$C6..../....6cTmqQY1RBmEDpaTTxIZlDpL1hjmt48P.1wUUWCkS5D$yr/UDeukAYvAdOk4zhDqajXq7bRp5ayLbvx17b1lcz/"## [1] TRUEAnother suggestion by the book is to use:

Figure 22.7: Kerberos
Kerberos (/ˈkɜːrbərɒs/) is a computer-network authentication protocol developed by Massachusetts Institute of Technology (MIT) and classified as “Auxiliary Military Equipment” by the authorites for its capacities of Data Encryption Standard (DES).
The development of the product followed with version updates and the implementation by other institutions included the Royal Institute of Technology in Sweden and the Stanford University made the system available outside the US with some limitations. Kerberos is available with RStudio Pro Products.
In general what happens in an app when setting up login credentials is described below.
In the ui you can use these commands for wrapping your code and build a module, while in the server() you should mind not to storage any form of credentials, but as said, storage them in a separate file (.xlm , .yml , .rds, .Renviron, …).
The server() should include the eventReactive() function to check whether the user’s login and password are valid credentials, raising a silent validation error.
server<- function(input,output,session){

eventReactive()

}
Examples:
1 - In this example is shown for simplicity an application of the {shinyauthr}: the credentials are located inside the server(), they should be in a config.yml file and then retrieved for use.
You may find yourself being prompted with something like this:

Figure 22.8: Credentials
library(shiny)

# dataframe that holds usernames, passwords and other user data
user_base <- dplyr::tibble(
  user = c("user1", "user2"),
  password = c("pass1", "pass2"),
  permissions = c("admin", "standard"),
  name = c("User One", "User Two")
)


ui <- fluidPage(
  # add logout button UI
  div(class =  "pull-right", # The HTML tag functions in Shiny, like div() and p() return objects that can be rendered as HTML
      shinyauthr::logoutUI(
        id = "logout")),
  # add login panel UI function
      shinyauthr::loginUI(
        id = "login"),
  # setup table output to show user info after login
  tableOutput("user_table")
)

server <- function(input, output, session) {
  # call login module supplying data frame,
  # user and password cols and reactive trigger
  credentials <- shinyauthr::loginServer(
    id = "login",
    data = user_base,
    user_col = user,
    pwd_col = password,
    log_out = reactive(logout_init())
  )

  # call the logout module with reactive trigger to hide/show
  logout_init <- shinyauthr::logoutServer(
    id = "logout",
    active = reactive(credentials()$user_auth)
  )

  output$user_table <- renderTable({
    # use req to only render results when credentials()$user_auth is TRUE
    req(credentials()$user_auth) # only run after a successful login
    credentials()$info
  })
}

#shinyApp(ui = ui, server = server)
When accessing an API or database in R, Shiny inputs use client-side validation and often requires to provide credentials such as a login name and password.
2 - Another example of Shiny inputs using client-side validation (input performed by JavaScript in the browser) where is possible for an attacker to send unexpected values is:
secrets <- list(
  a = "my name",
  b = "my birthday",
  c = "my social security number",
  d = "my credit card"
)

allowed <- c("a", "b")
ui <- fluidPage(
  selectInput("x", "x", choices = allowed),
  textOutput("secret")
)
An attacker can open up a JavaScript console in their browser and run Shiny.setInputValue("x", "c") to see client data that are not allowed to see.
To add a layer of security, in the server() is added the req() function, which ensure that values are available, and if any of the given values is not truthy, the operation is stopped by raising a “silent” exception.
?req()server <- function(input, output, session) {
output$secret <- renderText({
req(input$x %in% allowed) # this function
secrets[[input$x]]
})
}
# shinyApp(ui = ui, server = server)Finally, in case you want to skip the authentication step when testing the app:
- Use
testthat::skip()to automatically skip tests that require authentication.